
Imagine making bakery-quality cherry turnovers in your kitchen. These tasty pastries are simpler to make than you might think. With a few ingredients and basic baking skills, you can make golden, flaky turnovers filled with sweet cherry filling.
Cherry turnovers are great for impressing family and friends. This recipe is perfect for both beginners and experienced cooks. It will help you make delicious turnovers that look and taste like they’re from a professional bakery.
Table of Contents
Understanding Puff Pastry and Its Role in Perfect Turnovers
Creating flaky crusts is all about the magic of puff pastry. This delicate dough turns simple ingredients into amazing pastries with little effort. Puff pastry is a culinary wonder that brings impressive results right to your kitchen.
Puff pastry is usually found in the freezer section, near frozen pie crusts. Your success with cherry turnovers depends on choosing and handling this ingredient carefully.
Store-bought vs Homemade Puff Pastry Options
- Store-bought puff pastry offers convenience and consistent results
- Homemade puff pastry gives you control over ingredients
- Professional bakers prefer cold butter for maximum flakiness
Proper Thawing and Handling Techniques
Thawing puff pastry needs patience. Take the dough out of the freezer and let it sit at room temperature for 30-40 minutes. Never rush this process – quick handling can ruin those delicate layers you want in your dough.
Why Temperature Control Matters
| Temperature Stage | Impact on Pastry |
|---|---|
| Cold Dough | Maintains butter layers, ensures flaky crusts |
| Room Temperature | Allows gentle manipulation without breaking |
| Hot Oven | Creates dramatic rise and crisp texture |
“The secret to perfect puff pastry is cold ingredients and a hot oven.” – Professional Pastry Chef
Temperature control is key for those light, airy layers. Keep your puff pastry cold until just before use. Always bake in a preheated oven for the best results.
Essential Ingredients for Cherry Turnovers
Making tasty fruit-filled desserts begins with picking the right ingredients. The secret to a great pastry is using top-notch parts. These will turn simple items into a yummy treat.
- Puff pastry (2 rolls per package)
- Seasonal cherries or cherry pie filling
- 1 large egg for egg wash
- Cinnamon sugar
- Ingredients for vanilla glaze
Choosing the right ingredients is key. Let’s look at the important parts:
| Ingredient | Quantity | Purpose |
|---|---|---|
| Puff Pastry | 2 rolls | Creates flaky, golden crust |
| Cherry Filling | 1 cup | Primary fruit component |
| Brown Sugar | 2 Tablespoons | Adds sweetness |
| Cornstarch | ½ Tablespoon | Thickens filling |
| Egg | 1 large | Creates golden egg wash |
Pro tip: Choose fresh or high-quality canned cherries for the best taste.
“The secret to exceptional turnovers is using the freshest ingredients possible.” – Pastry Chef Recommendation
You can try different pie fillings like apple or blueberry. This pastry is versatile. It lets you get creative with your favorite fruits.
Creating the Perfect Cherry Filling
Making delicious handheld pies starts with a great cherry filling. The key to tasty cherry turnovers is choosing the right cherries. Then, you need to make a filling that’s just right, making your dessert stand out.
Fresh vs Frozen Cherry Options
When making cherry turnovers, you have two main choices:
- Fresh cherries: They have a vibrant flavor and natural sweetness.
- Frozen cherries: They’re easy to use and always ripe.
Fresh cherries need pitting and careful prep. Frozen cherries make things easier.
Achieving the Ideal Filling Consistency
The secret to a great cherry filling is getting the right thickness. Use cornstarch to keep the filling from being too runny. This is key for your handheld pies to be perfect.
| Ingredient | Quantity | Purpose |
|---|---|---|
| Cherries | 2 cups | Primary fruit base |
| Cornstarch | 2 tablespoons | Thickening agent |
| Granulated Sugar | 1/4 cup | Sweetness enhancement |
Elevating Flavor with Enhancers
Make your cherry filling amazing by adding flavor boosters:
- Almond extract: It adds depth and complexity.
- Lemon juice: It brings bright, tangy notes.
- Vanilla: It rounds out the flavor.
“The difference between a good filling and a great filling is in the details of flavor.” – Pastry Chef Recommendation
By picking the right cherries and balancing flavors, you’ll make handheld pies that everyone will love.
Step-by-Step Assembly Instructions
Making bakery delights like lattice-topped turnovers needs precision and care. Your cherry turnover journey starts with careful preparation and expert techniques. These steps turn simple ingredients into a stunning dessert.
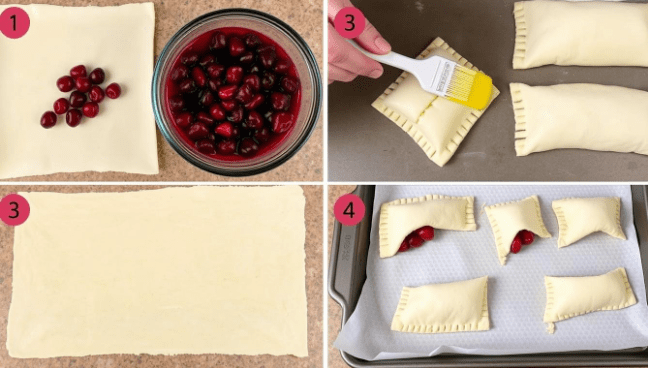
- Thaw your puff pastry sheet at room temperature for about 30 minutes
- Roll out the pastry to approximately 1/16 inch thickness
- Cut the pastry into 4-inch squares using a sharp knife or pastry cutter
- Place 2 tablespoons of prepared cherry filling in the center of each square
When folding your turnovers, technique is everything. Fold the pastry diagonally to make a triangle. Make sure the edges are sealed well. Use a fork to crimp the edges, so the filling doesn’t leak during baking.
“The art of a perfect turnover lies in its seamless construction and beautiful presentation.” – Pastry Chef Wisdom
For those wanting to elevate their bakery delights, consider these creative variations:
- Create lattice-topped turnovers by cutting out pastry strips
- Try making rectangular or circular shapes
- Add decorative egg wash for a golden, glossy finish
Remember to chill your assembled turnovers for 30 minutes before baking. This step helps keep their shape and ensures a crisp, flaky texture. It will impress any dessert lover.
Mastering the Sealing and Crimping Techniques
Making perfect bakery delights needs careful sealing and crimping of your cherry turnovers. The right methods make your handheld pies look great and stop filling leaks while baking.
Preventing Filling Leaks
To keep your filling safe, follow these key steps:
- Leave a 1/2-inch border around pastry edges
- Avoid overfilling your turnovers
- Press edges firmly with fingertips
- Use a fork to create additional seal
Decorative Edge Options
Make your bakery delights stand out with these crimping techniques:
- Classic fork crimp
- Scalloped edge using fingertips
- Braided edge for advanced bakers
- Rope-style pinched edges
Egg Wash Application Tips
An egg wash can make your handheld pies look amazing. Here are some professional tips:
| Egg Wash Ingredient | Benefit |
|---|---|
| 1 large egg | Golden color and shine |
| 1 tbsp water | Helps create smooth finish |
| Pinch of salt | Enhances adhesion |
“A perfect seal is the secret to magnificent handheld pies!” – Professional Baker
Pro tip: Chill your turnovers for 20 minutes before baking to help maintain their shape and prevent filling escape.
Baking Cherry Turnovers to Golden Perfection
Making baked pastries with flaky crusts needs precision and care. Your cherry turnovers will turn into golden delights with the right baking techniques.
- Preheat your oven to 375°F for even heat
- Put turnovers on a parchment-lined baking sheet
- Leave at least 2 inches between turnovers for air
- Bake for 20-22 minutes until they’re golden
Professional bakers say to watch your turnovers closely in the last minutes. The signs of perfectly baked flaky crusts are:
- Rich golden-brown color
- Puffed and crisp edges
- Visible layers in the pastry
“Patience transforms simple ingredients into extraordinary desserts” – Pastry Chef Recommendation
If you want to try something different, use an air fryer. Set it to 400°F and cook for 10-12 minutes, flipping halfway for even browning.
Pro tip: Let your baked pastries cool for at least 15 minutes before glazing. This prevents melting and gives a perfect finish.
Making the Classic Vanilla Glaze
Creating the perfect glaze turns your cherry turnovers into stunning bakery delights. It adds a beautiful touch that makes your homemade pastries look and taste like they were made by a pro.
The ultimate vanilla glaze is easy to make with just a few ingredients. You’ll need powdered sugar, milk, and vanilla extract. These are things you probably have in your kitchen already.
Glaze Ingredient Proportions
| Ingredient | Quantity |
|---|---|
| Powdered Sugar | 1 ¼ cups |
| Milk | 1-2 tablespoons |
| Vanilla Extract | ½ teaspoon |
Consistency Adjustments
Getting the glaze just right is an art. Start with these basic amounts and tweak as you go:
- For thicker glaze: Add more powdered sugar
- For thinner glaze: Add a bit more milk
- Go for a smooth, pourable texture that flows well
Application Methods
Here are some ways to apply your glaze to cherry turnovers:
- Use a spoon for a casual, rustic look
- Try a piping bag for a precise, pro-style design
- Wait 15 minutes for turnovers to cool before glazing
Pro tip: Let the glaze set for a few minutes before serving. This gives it a perfect, slightly hardened finish that makes your treats irresistible.
Storage and Make-Ahead Tips
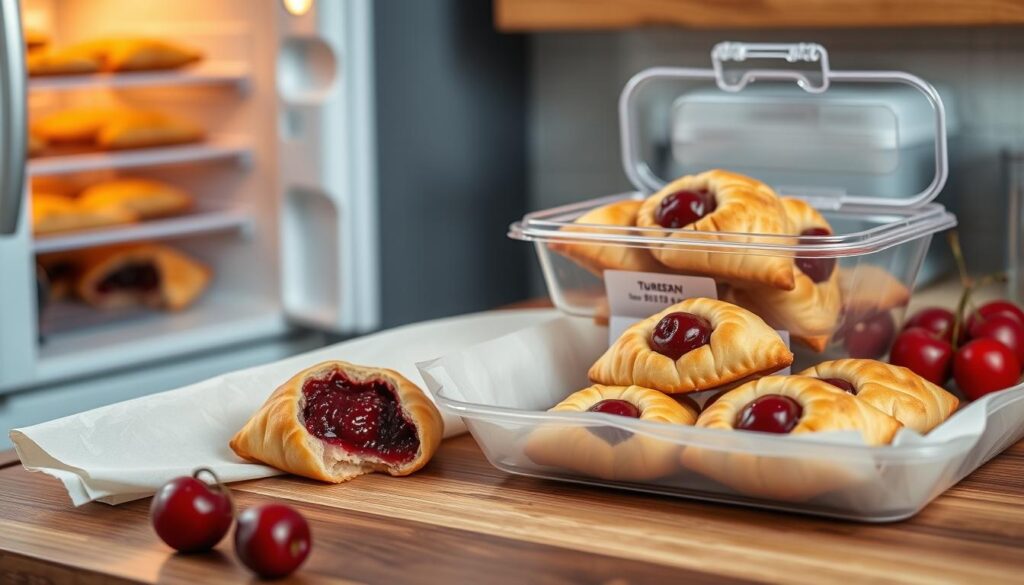
Making tasty fruit-filled desserts means knowing how to keep them fresh. Your cherry turnovers with butter-rich dough can be enjoyed right away or stored to keep them delicious.
Immediate Storage Recommendations
Let your cherry turnovers cool for 15-20 minutes after baking. Then, store them in an airtight container at room temperature. They stay fresh for up to 2 days, keeping their crispy outside and tasty filling.
Freezing Options
Freezing is a great way to keep these desserts fresh. You can freeze them in two ways:
- Freeze unbaked turnovers before baking
- Freeze fully baked turnovers
Freezing Nutritional Insights
| Nutritional Detail | Amount per Turnover |
|---|---|
| Calories | 419 kcal |
| Total Carbohydrates | 37g |
| Total Protein | 6g |
| Total Fat | 27g |
Freezing and Reheating Guidelines
Unbaked turnovers can be frozen for up to 30 days. To bake, thaw for 30-40 minutes and bake at 375°F for 28-30 minutes. Baked turnovers can be reheated at 350°F for 5-7 minutes to get crispy again.
“Preserving the quality of your butter-rich dough is an art that combines careful storage and strategic reheating.” – Pastry Chef Recommendation
Pro tip: Let frozen turnovers come to room temperature before baking. This ensures even heating and perfect golden-brown results.
Conclusion
Making cherry turnovers at home is a fun journey. It turns simple ingredients into delicious pastries. You’ll learn to work with puff pastry and seasonal cherries, opening up new possibilities in your kitchen.
These cherry turnovers are versatile. They impress everyone with just 40 minutes of prep and cooking. Feel free to try different fruits or even savory fillings to show off your creativity.
Baking is all about practice and passion. Every batch of cherry turnovers you make will get better. They’ll bring joy to your family and friends, whether as a weekend treat or a potluck dish.
So, get ready to bake! Dust off your baking sheet and start making cherry turnovers. Share them with your loved ones and add your own twist to this classic dessert. Happy baking!
FAQ
Can I use frozen cherries instead of fresh ones for my turnovers?
Absolutely! Frozen cherries are great for cherry turnovers. Just thaw and drain them well to avoid too much moisture. If using frozen cherries, cook them a bit longer to reduce liquid and intensify flavors.
How do I prevent my cherry turnovers from leaking during baking?
To stop leaks, seal your turnovers well. Use an egg wash on the edges, press firmly with a fork, and don’t overfill. Crimping the edges well and leaving a small vent helps prevent filling from leaking.
Can I make cherry turnovers ahead of time?
Yes! You can make unbaked turnovers and freeze them for up to 2 months. Just thaw and bake them, adding a few extra minutes. Baked turnovers can be stored at room temperature for 1-2 days or in the fridge for up to 5 days.
What’s the best way to reheat cherry turnovers?
For the best results, reheat turnovers in a preheated oven at 350°F for 5-7 minutes. This keeps them crispy. Avoid microwaving, as it can make the pastry soggy.
Can I use a different type of fruit in this recipe?
Definitely! This recipe works well with many fruits like blueberries, raspberries, or apple. Just keep the consistency similar and adjust sugar based on the fruit’s sweetness.
Do I need any special equipment to make cherry turnovers?
No special equipment is needed. You’ll need basic baking tools like a baking sheet, parchment paper, a rolling pin, and a fork for crimping. A pastry brush is helpful for egg wash, but not necessary.
How long do cherry turnovers take to make?
Making cherry turnovers takes about 1-1.5 hours. Filling preparation is 15-20 minutes, assembly 20-30 minutes, and baking 20-25 minutes.
Can I make these turnovers gluten-free?
Yes, you can use gluten-free puff pastry from most grocery stores. Make sure all ingredients are gluten-free, and handle the gluten-free pastry carefully.